winney

It is never too old to learn.

0%
winney

访问他人本地项目–使用火狐浏览器代理

设置——常规——网络设置——手动配置代理

火狐浏览器配置代理

手机访问电脑本地项目——使用Charles代理

1
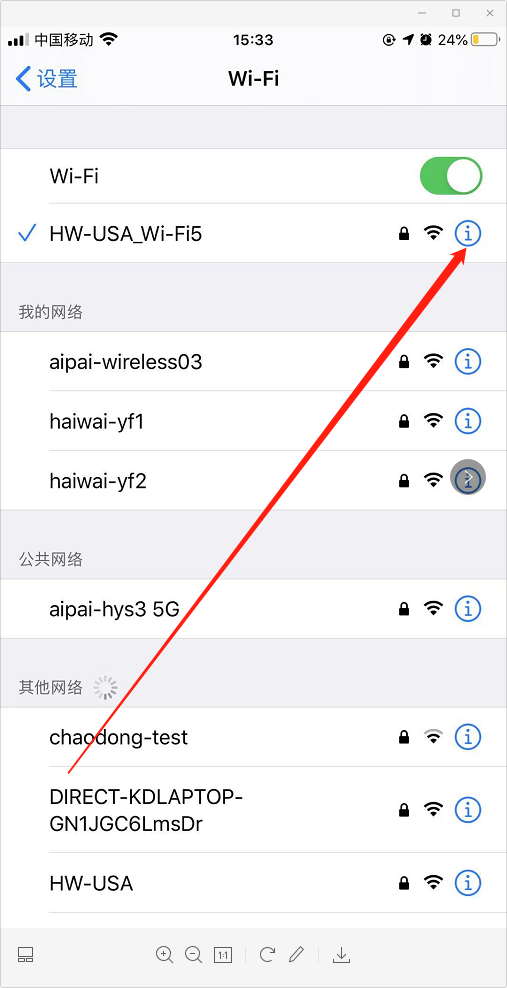
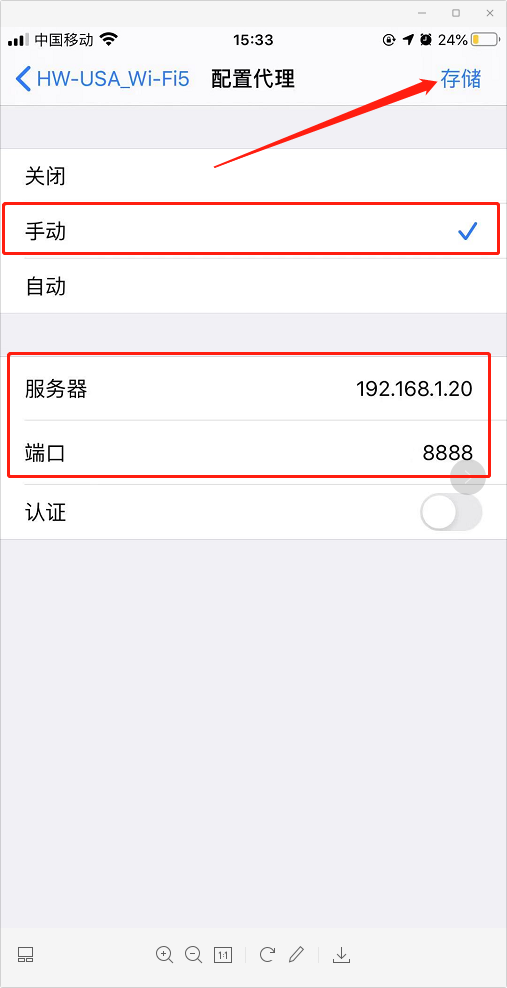
备注:使用手机端访问本地后台项目,在手机wifi里配置代理
注意:连接不成功,看一下端口号是否写错了
1
首次连接,需要在Charles上授权(allow)
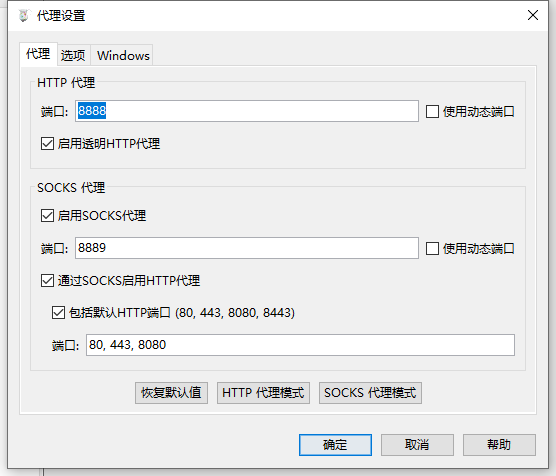
  • 电脑安装Charles,进行代理设置:“代理”——“代理设置”

代理设置

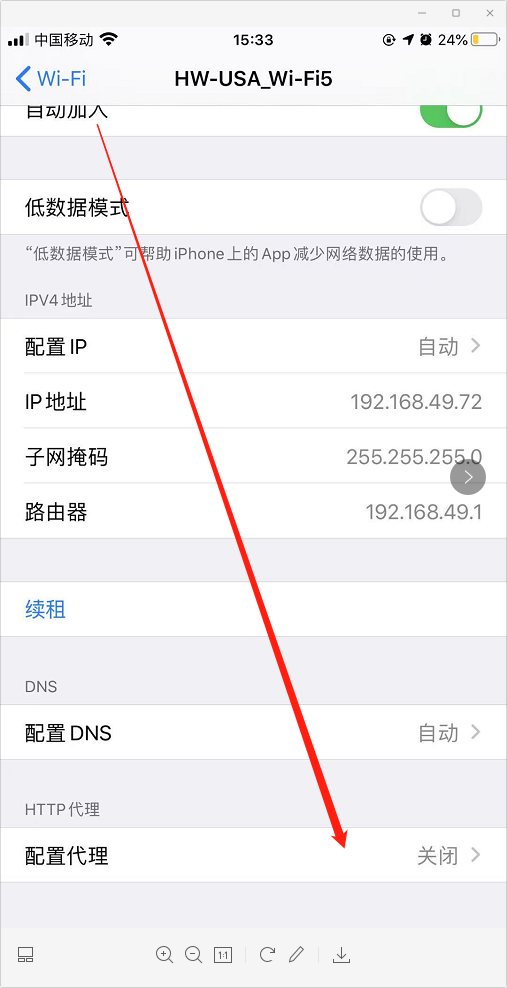
  • 在手机端要设置“HTTP代理”【注意:手机连接的WiFi要跟电脑端是在同一个路由】

imgimgimg

  • 配置好手机HTTP代理之后,在Charles中会弹出一个是否同意的一个确认框,选择同意之后;手机就可以访问本地的项目

如果在手机中忽略过该WiFi,重新连接上该WiFi后要重新设置“HTTP代理”

官网文档

docsify中文文档

摘自视觉派pieDocsify快速搭建个人博客

文档网站生成工具、快速搭建个人博客

docsify 是一个动态生成文档网站的工具。不同于 GitBook、Hexo 的地方是它不会将 .md 转成 .html 文件,所有转换工作都是在运行时进行。

这将非常实用,如果只是需要快速的搭建一个小型的文档网站,或者不想因为生成的一堆 .html 文件“污染” commit 记录,只需要创建一个 index.html 就可以开始写文档而且直接部署在GitHub Pages

特性

  • 无需构建,写完文档直接发布
  • 容易使用并且轻量 (~19kB gzipped)
  • 智能的全文搜索
  • 提供多套主题
  • 丰富的 API
  • 支持 Emoji
  • 兼容 IE10+
  • 支持 SSR (example)

生成文档的工具:

阿里的语雀、DokuWiki、MDwiki、HDwiki

使用Typora+docsify+GitHub Pages搭建团队知识库

文档案例

使用Vue全家桶+Node.js搭建的小型全栈项目

安装

全局安装docsify-cli工具,可以方便地创建及在本地预览生成的文档。

1
npm i docsify-cli -g

初始化项目

如果想在项目的 ./docs 目录里写文档,直接通过 init 初始化项目。

1
docsify init ./docs

本地预览

通过运行 docsify serve 启动一个本地服务器,可以方便地实时预览效果。默认访问地址 http://localhost:3000

1
docsify serve docs

添加左侧导航栏-loadSidebar: true

  1. 修改docs/index.html,配置 loadSidebar 选项

    1
    2
    3
    4
    5
    window.$docsify = {
    loadSidebar: true, // 开启左侧导航栏
    name: '',
    repo: ''
    }
  2. 在根目录(docs)(与index.html同目录)中,新建_sidebar.md文件

    1
    2
    3
    4
    5
    6
    7
    8
    9
    10
    11
    12
    * 常用网址     // 分组名

    * [Vue](website/vue.md) // 链接到对应文件
    * 收藏博客

    * [javascript](blogs/javascript.md)
    * 常用软件

    * [web前端](software/web.md)
    * 笔记

    [web前端](software/web.md)
  3. 配置 alias 避免不必要的回退过程 (即访问非根目录的页面时,会报_sidebar.md文件是404)

    1
    2
    3
    4
    5
    6
    window.$docsify = {
    loadSidebar: true,
    alias: {
    '/.*/_sidebar.md': '/_sidebar.md'
    }
    }
  4. 新建对应的文件(如:website/vue.md 【新建website目录,新建vue.md】)

docsify 侧边栏目录扩展

官方文档没有介绍左侧目录的折叠问题,可以使用这个开源:

git地址 https://github.com/iPeng6/docsify-sidebar-collapse

代码如下:

1
2
3
4
<link rel="stylesheet" href="//cdn.jsdelivr.net/npm/docsify-sidebar-collapse/dist/sidebar.min.css" />
<link rel="stylesheet" href="//cdn.jsdelivr.net/npm/docsify-sidebar-collapse/dist/sidebar-folder.min.css" />

<script src="//cdn.jsdelivr.net/npm/docsify-sidebar-collapse/dist/docsify-sidebar-collapse.min.js"></script>

使用sidebarDisplayLevel设置默认折叠的层级:

1
2
3
window.$docsify = {
sidebarDisplayLevel: 1, // 如果想收起的是第一层级,设置为0
}

然后根据自己需求修改样式。

侧边栏三层级配置

参考docsify侧边栏折叠

_sidebar.md:

1
2
3
4
5
6
7
8
* 项目
* [管理后台](project/manage.md)
* [新广告后台](project/ad_admin.md)
* [纳米盒应用后台2.0](project/AppManage2.0.md)
* [纳米盒管理后台](project/manage_new.md)
* [黄豆芽办公系统](project/ai.huangdouya.com.md)
* [黄豆芽sdk运营后台](project/hanteng-manage.vxinyou.com.md)
* [切支付](project/check_pay.md)

manage.md:(里面写什么都可以)

1
2
3
4
5
6
## 新广告后台
## 纳米盒应用后台2.0
## 纳米盒管理后台
## 黄豆芽办公系统
## 黄豆芽sdk运营后台
## 切支付

添加代码高亮

引入js文件:

1
<script src="//cdn.jsdelivr.net/npm/prismjs@1/components/prism-bash.min.js"></script>

参考代码高亮

写代码的时候要加上bash

1
2
3
​```bash
echo "hello"
​```

添加搜索功能

  1. 修改window.$docsify(在docs/index.html

    1
    2
    3
    4
    5
    6
    7
    8
    9
    10
    11
    12
    13
    14
    window.$docsify = {
    loadSidebar: true,
    name: '',
    repo: '',
    search: { // 添加
    noData: {
    '/': '无匹配结果'
    },
    paths: 'auto',
    placeholder: {
    '/': '搜索'
    }
    }
    }
  2. 添加search.min.js插件(在docs/index.html

    1
    <script src="//cdn.jsdelivr.net/npm/docsify/lib/plugins/search.min.js"></script>
    1
    <link rel="stylesheet" href="//cdn.jsdelivr.net/npm/docsify-sidebar-collapse/dist/sidebar.min.css" />

部署到服务器

如何把 Docsify 文档部署到服务器?

使用Typora+docsify+GitHub Pages搭建团队知识库

使用docsify 写开源文档+部署到云服务器

配置参考

1
2
3
4
5
6
7
8
9
10
11
12
13
14
15
16
17
18
19
20
21
22
23
24
25
26
27
28
29
30
31
32
33
34
35
36
37
38
39
40
41
42
43
44
45
46
47
48
49
50
51
52
53
54
55
56
57
58
59
60
61
62
63
64
65
66
67
68
69
70
71
72
73
74
75
76
77
78
79
80
81
82
83
84
85
86
87
88
89
90
91
92
93
94
95
96
97
98
99
100
101
102
103
104
105
106
107
108
109
110
111
112
113
114
115
<!DOCTYPE html>
<html lang="en">
<head>
<meta charset="UTF-8">
<title>工作文档</title>
<meta http-equiv="X-UA-Compatible" content="IE=edge,chrome=1" />
<meta name="description" content="Description">
<link rel="shortcut icon" href="./favicon.ico" />
<meta name="viewport" content="width=device-width, initial-scale=1.0, minimum-scale=1.0">
<link rel="stylesheet" href="//cdn.jsdelivr.net/npm/docsify@4/lib/themes/vue.css">
<link rel="stylesheet" href="//cdn.jsdelivr.net/npm/docsify-sidebar-collapse/dist/sidebar.min.css" />
<link rel="stylesheet" href="//cdn.jsdelivr.net/npm/docsify-sidebar-collapse/dist/sidebar-folder.min.css" />
<style>
a{
text-decoration: none;
}
a:hover{
text-decoration: underline;
}
.sidebar ul li a{
/* color: #0088CC !important; */
font-weight: normal;
}
.content td a, .content p a{
font-weight: normal;
}
.markdown-section blockquote p{
font-weight: normal;
}
.markdown-section h5{
font-size: 1.05rem;
margin-top: 0.5rem;
margin-bottom: 1rem;
}
.markdown-section hr{
margin: 2em 0 0.5rem;
}
.sidebar-nav ul:not(.app-sub-sidebar)>li.folder::before{
display: none;
}
.sidebar-nav ul:not(.app-sub-sidebar)>li.file::before{
background: none;
}
.sidebar-nav ul:not(.app-sub-sidebar)>li::before{
content: "-";
top: -1px;
left: -10px;
width: 10px;
height: 10px;
}
.sidebar-nav ul:not(.app-sub-sidebar)>li.open::before{
transform: none;
}
.markdown-section p{
margin: 0;
}
.markdown-section th{
background-color: #f8f8f8;
color: #909399;
}
.markdown-section pre{
padding: 0 0.6rem;
margin: 0.6em 0;
}
.markdown-section pre>code{
padding: 0.4rem 5px;
}
.markdown-section code, .markdown-section output:after, .markdown-section pre{
font-family: 'Source Sans Pro,Helvetica Neue,Arial,sans-serif';
}
/* .sidebar{
width: 200px;
}
.sidebar-toggle{
width: 184px;
}
.content{
left: 200px;
}
.markdown-section{
max-width: 90%;
} */
</style>
</head>
<body>
<div id="app"></div>
<script>
window.$docsify = {
// name: '工作文档',
auto2top: true,
repo: '',
loadSidebar: true,
sidebarDisplayLevel: 0,
// subMaxLevel: 2,
alias: {
'/.*/_sidebar.md': '/_sidebar.md'
},
search: {
noData: {
'/': '无匹配结果'
},
paths: 'auto',
placeholder: {
'/': '搜索'
}
}
}
</script>
<!-- Docsify v4 -->
<script src="//cdn.jsdelivr.net/npm/docsify@4"></script>
<script src="//cdn.jsdelivr.net/npm/docsify/lib/plugins/search.min.js"></script>
<script src="//cdn.jsdelivr.net/npm/docsify-sidebar-collapse/dist/docsify-sidebar-collapse.min.js"></script>
<script src="//cdn.jsdelivr.net/npm/prismjs@1/components/prism-bash.min.js"></script>
</body>
</html>

Node.js官网

Cnode社区

Node.js中文网

Node.js 中文文档 | Node.js 中文网

淘宝NPM镜像

Node.js&HTML5论坛

npmmirror 镜像站 或 npm.taobao.org

后端处理分页数据的接口 参考博客

element+express+mongoose实现分页查询

MongoDB With Node.js | MongoDB

后端接口代码:

1
2
3
4
5
6
7
8
9
10
11
12
13
14
15
16
17
18
19
20
21
22
app.get('/api/getSources',async(req, res)=>{
let currentPage = parseInt(req.query.currentPage) // 转换前端传入当前页码
let pageSize = parseInt(req.query.pageSize) // 转换前端传入的每页大小
let skip = (currentPage-1)*pageSize // 实现分割查询的skip
let params = {}

// 所有数据
var allSources = await Sources.find();
var allCount = allSources.length;
var allPage = Math.ceil(allCount/pageSize);

// 根据页码和每页显示条数筛选数据
const sources = await Sources.find(params).skip(skip).limit(pageSize)

var object ={
allCount: allCount,
allPage: allPage,
page: currentPage,
data: sources
}
res.send(object)
})

前端请求接口代码:

1
2
3
4
5
6
7
8
9
10
/**
* 获取素材列表
*/
export const getSources = (param) => {
return request({
method: 'GET',
url: '/getSources',
params: param
})
}

.vue页面:

1
2
3
4
5
6
7
8
9
10
11
12
13
14
15
16
17
18
19
20
21
22
23
24
25
26
27
28
29
30
31
32
33
34
35
36
37
38
<el-pagination
@size-change="handleSizeChange"
@current-change="handleCurrentChange"
:current-page="currentPage"
:page-sizes="[10, 15, 20, 25, 30]"
:page-size="pageSize"
layout="total, sizes, prev, pager, next, jumper"
:total="allCount">
</el-pagination>


sourceList: [],
allCount: 0,
pageSize: 10,
currentPage: 1,

created () {
// 渲染第一页的数据
this.initData(this.currentPage)
},

initData (thisPage) {
let param = {
currentPage: thisPage,
pageSize: this.pageSize,
}
getSources(param).then(res => {
console.log(res)
this.sourceList = res.data.data
this.allCount = res.data.allCount
})
},

handleCurrentChange(val) {
// console.log(`当前页: ${val}`);
// 渲染相应页码的数据
this.initData(val)
}

创建package.json:

1
npm init

npm模块管理器

我们安装了Nodejs是安装了什么

安装 Node 和 gulp

安装

node安装包下载地址

  1. 下载.msi文件
  2. 按”下一步”,”下一步”装好
  3. 双击安装好的目录里面的”node.exe”,文件,输入node (这一步好像不需要)
  4. 创建一个app.js文件
1
2
3
4
5
6
7
8
9
10
11
12
const http = require("http");
const hostname = "127.0.0.1";
const port = 3000;
const server = http.createServer((req, res) => {
res.statusCode = 200;
res.setHeader('Content-Type', 'text/plain');
res.end('He1lo world\n');
});

server.listen(port, hostname, ()=> {
console.log(`Server running at http://${hostname}:${port}/`)
});
  1. 运行app.js:
1
node app.js
  1. 在浏览器中预览
1
2
3
http://localhost:3000/ 
或者
http://127.0.0.1:3000/

使用淘宝NPM镜像

1
npm install -g cnpm --registry=https://registry.npm.taobao.org

清屏命令(清掉历史操作记录)

1
cls

取消命令继续执行

1
Ctrl +  C 

window下通过nvm-windows来安装多版本node

[全栈最后一公里 - Scott 带你学习 Node.js 线上服务器部署与发布](http://www.imooc.com/article/17554 Scott)

七天学会NodeJS

Handlebars-轻量的语义化模板

什么是异步I/O?

就是我们读取/写入文件或者操作数据库的时候,此时应该是异步的读取。CPU命令磁盘驱动器读取文件,CPU此时不能死等磁盘返回结果,如果死等CPU自己就被阻塞了,性能是极大的浪费。比如:PHP读取文件,性能就不高,因为被阻塞了。

Node.js创建第一个应用

如果我们使用PHP来编写后端的代码时,需要Apache 或者Nginx 的 HTTP服务器,来处理客户端的请求相应。不过对Node.js 来说,概念完全不一样了。使用 Node.js时,我们不仅仅在实现一个应用,同时还实现了整个HTTP服务器。

  1. 引入http模块
1
var http= require("http");
  1. 创建服务器

接下来我们使用http.createServer()方法创建服务器,并使用listen方法绑定8888端口。函数通过request, response参数来接收和响应数据。

1
2
3
4
5
6
7
8
9
10
11
12
13
14
15
var http = require('http');

http.createServer(functio (request, response){
// 发送HTTP头部
// HTTP状态值: 200 : oK
// 设置HTTP头部,状态码是200,文件类型是html,字符集是utf8
response.writeHead(200,{"Content-Type":"text/html;charset=UTF-8"});

// 发送响应数据“Hello World"
res.end("哈哈哈哈,我买了一个iPhone" +(1+2+3)+"s"");

}).listen(8888);

// 终端打印如下信息
console.log("Server running at http://127.0.0.1:8888/");

结束响应:

1
res.end();

node.js查询数据,倒序排序:sort(‘-字段名’)

1
2
3
4
5
6
7
let currentPage = parseInt(req.query.currentPage) // 转换前端传入当前页码
let pageSize = parseInt(req.query.pageSize) // 转换前端传入的每页大小
let skip = (currentPage-1)*pageSize // 实现分割查询的skip
let params = {'delete_time': "0"};

// 根据页码和每页显示条数筛选数据
const sources = await Sources.find(params).sort('-create_time').skip(skip).limit(pageSize)

常用的Nodejs开发工具

  • Express.js
  • Socket.io
  • Meteor
  • Keystone
  • Koa.js
  • PM2.5
  • Electrode.js
  • Babel
  • Broccoli
  • Webpack

JSON Server——模拟服务端接口数据

一般用在前后端分离后,前端人员可以不依赖 API开发,而在本地搭建一个 JSON服务,自己产生测试数据。

一个在本地运行,可以存储 json数据的 server

  1. 安装

    1
    npm install -g json-server
  2. 通过查看版本号,来测试是否安装成功

    1
    json-server -v
  3. 创建json数据 – db.json

    1
    2
    3
    4
    5
    6
    7
    8
    9
    10
    11
    12
    13
    14
    15
    16
    17
    18
    {
    "posts": [
    {
    "title": "title",
    "id": 1
    },
    ],
    "comments": [
    {
    "id": 1,
    "body": "some comment",
    "postId": 1
    }
    ],
    "profile": {
    "name": "typicode"
    }
    }
  4. 开始服务——进入到 db.json文件所在的目录,执行以下代码

    1
    json-server --watch db.json

    json-server 默认是 3000端口,我们也可以自己指定端口,指令如下:

    1
    json-server --watch db.json --port 5000(端口号)
  5. 查看接口返回数据

    1
    http://localhost:5000/posts
  6. 增删改查相关操作,看语雀中的笔记

截屏保存图片插件

casperjs

phantomjs

capture-phantomjs