本地目录
- 实战项目目录:
H:\Gitee\wx_code
- 参考项目目录:
H:\Test_Code\wx_code
云服务器目录
/usr/local/src/webCode/wx
node命令使用之前
接口管理
使用apifox
接口文档
项目设置——数据管理——导出数据——Markdown格式
UI框架
开源项目
微信小程序开源项目库集合
企业级微信小程序实战详解
微信小程序开源项目排行榜
微信小程序实战-音乐播放器
微信小程序初始化项目架构
微信小程序项目实战(商城)
微信小程序实战之仿今日头条
课程链接
开发测试号
申请小程序测试号
步骤
- 注册【使用未在微信公众平台使用过的邮箱,注册】
- 需要有AppID【开发——开发管理——开发设置】
- 新建项目【开发阶段,若没有AppID,可使用测试号,上线的时候改为自己的AppID就行】
- 在微信开发者工具的右上角【详情】中,可以更改AppID
编译模式:
普通编译:默认打开的是首页
如果想调试某个页面,可以添加编译模式
基础库
在本地设置中,可以查看到【调试基础库】,根据对应的版本,查找对应的api
开发阶段,在本地设置中,将”不校验合法域名、web-view(业务域名)、TLS版本以及HITPS证书“勾选上
页面路径
在模拟器的下方,可以看到页面路径和页面参数
结构目录
目录结构
1
2
3
4
5
6
7
8
9
10
11
12
13
14
15
16
17
18
19
20
21
22
| ├─pages _____________页面文件夹
│ ├─index _____________首页
│ │ index.js _____________首页的逻辑文件
│ │ index.json _____________首页的配置文件
│ │ index.wxml _____________首页的结构文件
│ │ index.wxss _____________首页的样式文件
│ │
│ └─logs _____________日志 页面
│ logs.js
│ logs.json
│ logs.wxml
│ logs.wxss
│
└─utils _____________第三方的工具js(可以删除的)
│ util.js
│ .eslintrc.js
│ app.js _____________项目的全局入口文件
│ app.json _____________全局配置文件
│ app.wxss _____________全局样式文件
│ project.config.json _____________项目的配置文件 如appid
│ project.private.config.json
│ sitemap.json _____________微信索引配置文件
|
sitemap配置 用来配置小程序及其页面是否允许被微信索引
app.json
快速新建目录及里面的相关文件
在app.json中的pages属性中,添加"pages/demo/demo",保存之后,会在pages目录中自动创建demo目录,以及demo.wxml、demo.wxss、demo.js、demo.json
1
2
3
4
5
| "pages":[
"pages/index/index",
"pages/logs/logs",
"pages/demo/demo"
],
|
数据绑定
列表渲染
条件渲染
模板
引用,import和include
事件详解
1
| <view id="tapTest" data-hi="Weixin" bindtap="tapName"> Click me! </view>
|
1
2
3
4
5
| Page({
tapName: function(event) {
console.log(event)
}
})
|
dataset
在 WXML 中,这些自定义数据以 data- 开头,多个单词由连字符 - 连接。这种写法中,连字符写法会转换成驼峰写法,而大写字符会自动转成小写字符。如:
data-element-type ,最终会呈现为 event.currentTarget.dataset.elementType ;data-elementType ,最终会呈现为 event.currentTarget.dataset.elementtype 。
页面配置
1
2
3
4
5
6
7
| {
"navigationBarBackgroundColor": "#ffffff",
"navigationBarTextStyle": "black",
"navigationBarTitleText": "微信接口功能演示",
"backgroundColor": "#eeeeee",
"backgroundTextStyle": "light"
}
|
封装 wx.request方法
utils/request.js:
1
2
3
4
5
6
7
8
9
10
11
12
13
14
15
16
17
18
19
20
21
22
23
24
25
26
27
28
29
30
31
32
33
| //request.js
const baseUrl = 'https://www.winney07.cn:8080/'
const request = (url, method, data) => {
return new Promise((resolve, reject) => {
wx.request({
url: baseUrl + url,
method: method,
data: data,
success: res => {
resolve(res.data)
},
fail: err => {
reject(err)
}
})
})
}
const get = (url, data) => {
return request(url, 'GET', data)
}
const post = (url, data) => {
return request(url, 'POST', data)
}
export default {
baseUrl,
request,
get,
post
}
|
使用
1
2
3
4
5
6
7
8
9
10
11
12
13
14
15
16
17
18
19
20
| import request from '../../utils/request.js'
// 请求接口,获取数据
async getData() {
const swiperList = await request.get('shopping/swiper');
const tabList = await request.get('shopping/good/tabList');
const goodList = await request.get('shopping/good/getGoodList');
this.setData({
swiperList,
tabList,
goodList
})
},
/**
* 生命周期函数--监听页面加载
*/
onLoad(options) {
this.getData();
},
|
父子组件之间传值
父组件:
1
| <good-list goodsList="{{goodsList}}"></good-list>
|
子组件.js:
1
2
3
4
5
6
7
8
| Component({
properties: {
goodsList: {
type: Array,
value: []
}
},
})
|
子组件.wxml:
1
2
3
4
5
6
7
| <view class="good-list">
<block
wx:for="{{ goodsList }}"
wx:key="index">
<good-card class="good-item" i="{{index}}" data="{{item}}"></good-card>
</block>
</view>
|
事件监听
传参
goods/category/index:
1
2
3
4
5
6
7
8
9
10
| <van-grid-item
use-slot
class="grid-item"
data-groupid="{{item.groupId}}"
bindtap="toList">
.....
.....
.....
</van-grid-item>
|
1
2
3
4
5
6
7
8
| toList(event) {
console.log('event');
console.log(event.currentTarget.dataset); // {groupid: "249480"}
let groupid = event.currentTarget.dataset.groupid;
wx.navigateTo({
url: `/pages/goods/list/index?groupid=${groupid}`
})
},
|
在元素中自定义的data-属性,在event.currentTarget.dataset中。
获取URL传来的参数:
goods/list/index.js:
1
2
3
4
| onLoad(options) {
console.log('options');
console.log(options); // {groupid: "249480"}
},
|
微信小游戏
微信小游戏账号注册教程
在微信开发者中,创建小游戏项目,进入项目后,界面是黑色的。
需要注册个测试号(这个测试号是针对小游戏的)
开发测试号
申请小程序测试号
在微信开发中创建小游戏项目时,选择”测试号“,进入项目,即可正常显示
微信公众平台用户信息相关接口调整公告
报错信息
微信小程序编译遇到 ReferenceError: regeneratorRuntime is not defined 解决办法
解析方法:
打包前,在js文件中加入
1
| import regeneratorRuntime from "./runtime"
|
在地图上显示当前位置
- 在
.json页面中进行配置permission
1
2
3
4
5
6
7
8
9
10
11
12
| {
"pages":[
"pages/index/index",
"pages/logs/logs"
],
"permission": {
"scope.userLocation": {
"desc": "你的位置信息将用于小程序位置接口的效果展示" // 高速公路行驶持续后台定位
}
}
}
|
- 获取位置
1
2
3
4
5
6
7
8
9
10
11
| wx.getLocation({
type: 'wgs84',
success: (res) => {
var latitude = res.latitude // 纬度
var longitude = res.longitude // 经度
console.log('维度')
console.log(latitude)
console.log('经度')
console.log(longitude)
}
})
|
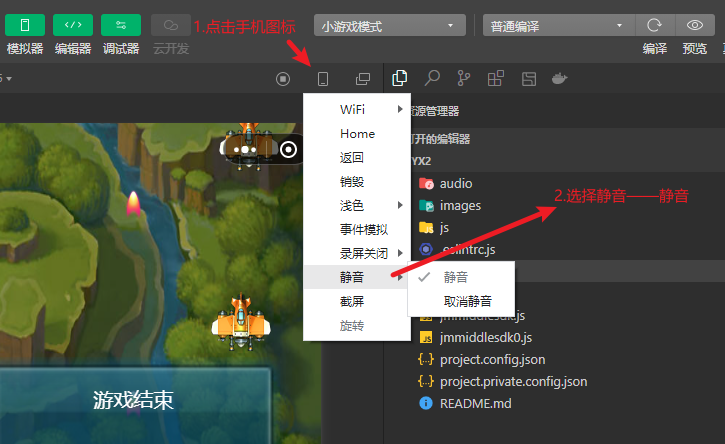
微信开发者工具-关闭声音