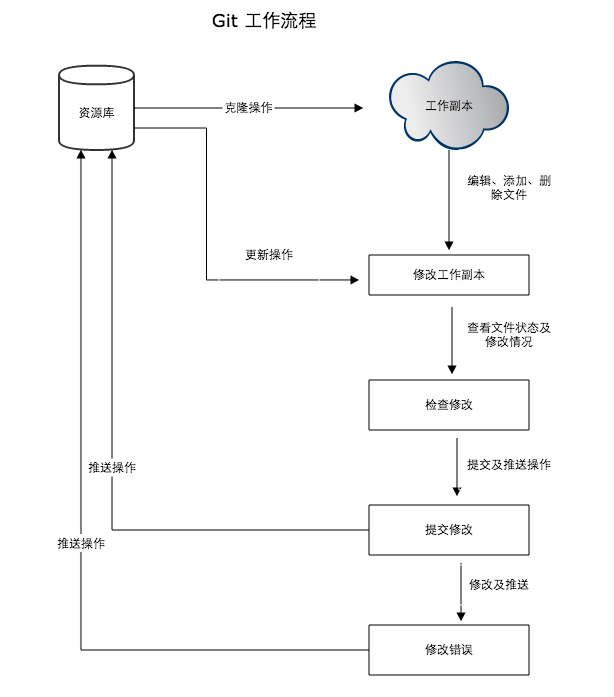
阮一峰网络日志:http://www.ruanyifeng.com/blog/2012/07/git.html
1、Git 工作流程 Git 作为一个源码管理系统,不可避免涉及到多人协作。
协作必须有一个规范的工作流程,让大家有效地合作,使得项目井井有条地发展下去。”工作流程”在英语里,叫做”workflow”或者”flow”,原意是水流,比喻项目像水流那样,顺畅、自然地向前流动,不会发生冲击、对撞、甚至漩涡。
本文介绍三种广泛使用的工作流程:
Git flow
Github flow
Gitlab flow
如果你对Git还不是很熟悉,可以先阅读下面的文章。
一、功能驱动 本文的三种工作流程,有一个共同点:都采用“功能驱动式开发” (Feature-driven development,简称FDD)。
它指的是,需求是开发的起点,先有需求再有功能分支(feature branch)或者补丁分支(hotfix branch)。完成开发后,该分支就合并到主分支,然后被删除。
二、Git flow 最早诞生、并得到广泛采用的一种工作流程,就是Git flow 。
2.1 特点 它最主要的特点有两个。
首先,项目存在两个长期分支。
前者用于存放对外发布的版本,任何时候在这个分支拿到的,都是稳定的分布版;后者用于日常开发,存放最新的开发版。
其次,项目存在三种短期分支。
功能分支(feature branch)
补丁分支(hotfix branch)
预发分支(release branch)
一旦完成开发,它们就会被合并进develop或master,然后被删除。
Git flow 的详细介绍,请阅读我翻译的中文版《Git 分支管理策略》 。
2.2 评价 Git flow的优点是清晰可控,缺点是相对复杂,需要同时维护两个长期分支。大多数工具都将master当作默认分支,可是开发是在develop分支进行的,这导致经常要切换分支,非常烦人。
更大问题在于,这个模式是基于”版本发布”的,目标是一段时间以后产出一个新版本。但是,很多网站项目是”持续发布”,代码一有变动,就部署一次。这时,master分支和develop分支的差别不大,没必要维护两个长期分支。
三、Github flow Github flow 是Git flow的简化版,专门配合”持续发布”。它是 Github.com 使用的工作流程。
3.1 流程 它只有一个长期分支,就是master,因此用起来非常简单。
官方推荐的流程 如下。
第一步:根据需求,从master拉出新分支,不区分功能分支或补丁分支。
第二步:新分支开发完成后,或者需要讨论的时候,就向master发起一个pull request (简称PR)。
第三步:Pull Request既是一个通知,让别人注意到你的请求,又是一种对话机制,大家一起评审和讨论你的代码。对话过程中,你还可以不断提交代码。
第四步:你的Pull Request被接受,合并进master,重新部署后,原来你拉出来的那个分支就被删除。(先部署再合并也可。)
3.2 评价 Github flow 的最大优点就是简单,对于”持续发布”的产品,可以说是最合适的流程。
问题在于它的假设:master分支的更新与产品的发布是一致的。也就是说,master分支的最新代码,默认就是当前的线上代码。
可是,有些时候并非如此,代码合并进入master分支,并不代表它就能立刻发布。比如,苹果商店的APP提交审核以后,等一段时间才能上架。这时,如果还有新的代码提交,master分支就会与刚发布的版本不一致。另一个例子是,有些公司有发布窗口,只有指定时间才能发布,这也会导致线上版本落后于master分支。
上面这种情况,只有master一个主分支就不够用了。通常,你不得不在master分支以外,另外新建一个production分支跟踪线上版本。
四、Gitlab flow Gitlab flow 是 Git flow 与 Github flow 的综合。它吸取了两者的优点,既有适应不同开发环境的弹性,又有单一主分支的简单和便利。它是 Gitlab.com 推荐的做法。
4.1 上游优先 Gitlab flow 的最大原则叫做”上游优先”(upsteam first),即只存在一个主分支master,它是所有其他分支的”上游”。只有上游分支采纳的代码变化,才能应用到其他分支。
Chromium项目 就是一个例子,它明确规定,上游分支依次为:
Linus Torvalds的分支
子系统(比如netdev)的分支
设备厂商(比如三星)的分支
4.2 持续发布 Gitlab flow 分成两种情况,适应不同的开发流程。
对于”持续发布”的项目,它建议在master分支以外,再建立不同的环境分支。比如,”开发环境”的分支是master,”预发环境”的分支是pre-production,”生产环境”的分支是production。
开发分支是预发分支的”上游”,预发分支又是生产分支的”上游”。代码的变化,必须由”上游”向”下游”发展。比如,生产环境出现了bug,这时就要新建一个功能分支,先把它合并到master,确认没有问题,再cherry-pick到pre-production,这一步也没有问题,才进入production。
只有紧急情况,才允许跳过上游,直接合并到下游分支。
4.3 版本发布
对于”版本发布”的项目,建议的做法是每一个稳定版本,都要从master分支拉出一个分支,比如2-3-stable、2-4-stable等等。
以后,只有修补bug,才允许将代码合并到这些分支,并且此时要更新小版本号。
五、一些小技巧 5.1 Pull Request
功能分支合并进master分支,必须通过Pull Request(Gitlab里面叫做 Merge Request)。
前面说过,Pull Request本质是一种对话机制,你可以在提交的时候,@相关人员 或团队 ,引起他们的注意。
5.2 Protected branch master分支应该受到保护,不是每个人都可以修改这个分支,以及拥有审批 Pull Request 的权力。
Github 和 Gitlab 都提供”保护分支”(Protected branch)这个功能。
5.3 Issue Issue 用于 Bug追踪和需求管理。建议先新建 Issue,再新建对应的功能分支。功能分支总是为了解决一个或多个 Issue。
功能分支的名称,可以与issue的名字保持一致,并且以issue的编号起首,比如”15-require-a-password-to-change-it”。
开发完成后,在提交说明里面,可以写上”fixes #14”或者”closes #67”。Github规定,只要commit message里面有下面这些动词 + 编号,就会关闭对应的issue。
close
closes
closed
fix
fixes
fixed
resolve
resolves
resolved
这种方式还可以一次关闭多个issue,或者关闭其他代码库的issue,格式是username/repository#issue_number。
Pull Request被接受以后,issue关闭,原始分支就应该删除。如果以后该issue重新打开,新分支可以复用原来的名字。
5.4 Merge节点 Git有两种合并:一种是”直进式合并”(fast forward),不生成单独的合并节点;另一种是”非直进式合并”(none fast-forword),会生成单独节点。
前者不利于保持commit信息的清晰,也不利于以后的回滚,建议总是采用后者(即使用–no-ff参数)。只要发生合并,就要有一个单独的合并节点。
5.5 Squash 多个commit 为了便于他人阅读你的提交,也便于cherry-pick或撤销代码变化,在发起Pull Request之前,应该把多个commit合并成一个。(前提是,该分支只有你一个人开发,且没有跟master合并过。)
这可以采用rebase命令附带的squash操作,具体方法请参考我写的《Git 使用规范流程》 。
2、Git分支管理策略 如果你严肃对待编程,就必定会使用”版本管理系统 “(Version Control System)。
眼下最流行的”版本管理系统”,非Git 莫属。
相比同类软件,Git有很多优点。其中很显著的一点,就是版本的分支(branch)和合并(merge)十分方便。有些传统的版本管理软件,分支操作实际上会生成一份现有代码的物理拷贝,而Git只生成一个指向当前版本(又称”快照”)的指针,因此非常快捷易用。
但是,太方便了也会产生副作用。如果你不加注意,很可能会留下一个枝节蔓生、四处开放的版本库,到处都是分支,完全看不出主干发展的脉络。
Vincent Driessen 提出了一个分支管理的策略 ,我觉得非常值得借鉴。它可以使得版本库的演进保持简洁,主干清晰,各个分支各司其职、井井有条。理论上,这些策略对所有的版本管理系统都适用,Git只是用来举例而已。如果你不熟悉Git,跳过举例部分就可以了。
一、主分支Master
首先,代码库应该有一个、且仅有一个主分支。所有提供给用户使用的正式版本,都在这个主分支上发布。
Git主分支的名字,默认叫做Master。它是自动建立的,版本库初始化以后,默认就是在主分支在进行开发。
二、开发分支Develop
主分支只用来分布重大版本,日常开发应该在另一条分支上完成。我们把开发用的分支,叫做Develop。
这个分支可以用来生成代码的最新隔夜版本(nightly)。如果想正式对外发布,就在Master分支上,对Develop分支进行”合并”(merge)。
Git创建Develop分支的命令:
1 git checkout -b develop master
将Develop分支发布到Master分支的命令:
### 切换到Master分支
### 对Develop分支进行合并
1 git merge --no-ff develop
这里稍微解释一下,上一条命令的–no-ff参数是什么意思。默认情况下,Git执行”快进式合并”(fast-farward merge),会直接将Master分支指向Develop分支。
使用–no-ff参数后,会执行正常合并,在Master分支上生成一个新节点。为了保证版本演进的清晰,我们希望采用这种做法。关于合并的更多解释,请参考Benjamin Sandofsky的《Understanding the Git Workflow》 。
三、临时性分支
前面讲到版本库的两条主要分支:Master和Develop。前者用于正式发布,后者用于日常开发。其实,常设分支只需要这两条就够了,不需要其他了。
但是,除了常设分支以外,还有一些临时性分支,用于应对一些特定目的的版本开发。临时性分支主要有三种:
* 功能(feature)分支
* 预发布(release)分支
* 修补bug(fixbug)分支
这三种分支都属于临时性需要,使用完以后,应该删除,使得代码库的常设分支始终只有Master和Develop。
四、 功能分支
接下来,一个个来看这三种”临时性分支”。
第一种是功能分支,它是为了开发某种特定功能,从Develop分支上面分出来的。开发完成后,要再并入Develop。
功能分支的名字,可以采用feature-*的形式命名。
创建一个功能分支:
1 git checkout -b feature-x develop
开发完成后,将功能分支合并到develop分支:
1 2 3 git checkout develop git merge --no-ff feature-x
删除feature分支:
五、预发布分支
第二种是预发布分支,它是指发布正式版本之前(即合并到Master分支之前),我们可能需要有一个预发布的版本进行测试。
预发布分支是从Develop分支上面分出来的,预发布结束以后,必须合并进Develop和Master分支。它的命名,可以采用release-*的形式。
创建一个预发布分支:
1 git checkout -b release-1.2 develop
确认没有问题后,合并到master分支:
1 2 3 git checkout master git merge --no-ff release-1.2
对合并生成的新节点,做一个标签
再合并到develop分支:
1 2 3 git checkout develop git merge --no-ff release-1.2
最后,删除预发布分支:
1 git branch -d release-1.2
六、修补bug分支
最后一种是修补bug分支。软件正式发布以后,难免会出现bug。这时就需要创建一个分支,进行bug修补。
修补bug分支是从Master分支上面分出来的。修补结束以后,再合并进Master和Develop分支。它的命名,可以采用fixbug-*的形式。
创建一个修补bug分支:
1 git checkout -b fixbug-0.1 master
修补结束后,合并到master分支:
1 2 3 4 5 git checkout master git merge --no-ff fixbug-0.1 git tag -a 0.1.1
再合并到develop分支:
1 2 3 git checkout develop git merge --no-ff fixbug-0.1
最后,删除”修补bug分支”:
1 git branch -d fixbug-0.1
3、常用 Git 命令清单 我每天使用 Git ,但是很多命令记不住。
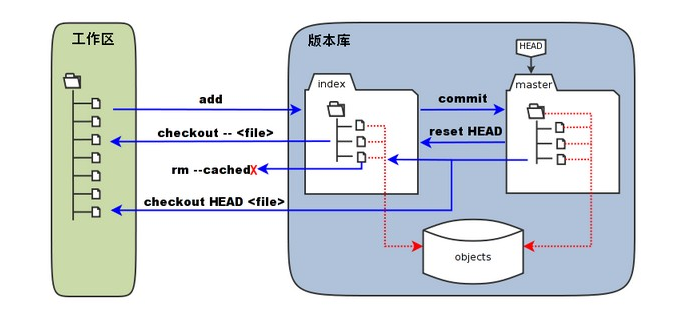
一般来说,日常使用只要记住下图6个命令,就可以了。但是熟练使用,恐怕要记住60~100个命令。
下面是我整理的常用 Git 命令清单。几个专用名词的译名如下。
Workspace:工作区
Index / Stage:暂存区
Repository:仓库区(或本地仓库)
Remote:远程仓库
一、新建代码库 在当前目录新建一个Git代码库
新建一个目录,将其初始化为Git代码库
下载一个项目和它的整个代码历史
二、配置 Git的设置文件为.gitconfig,它可以在用户主目录下(全局配置),也可以在项目目录下(项目配置)。
显示当前的Git配置
编辑Git配置文件
1 git config -e [--global]
设置提交代码时的用户信息
1 2 3 git config [--global] user.name "[name]" git config [--global] user.email "[email address]"
三、增加/删除文件 添加指定文件到暂存区
1 git add [file1] [file2] ...
添加指定目录到暂存区,包括子目录
添加当前目录的所有文件到暂存区
添加每个变化前,都会要求确认
对于同一个文件的多处变化,可以实现分次提交
删除工作区文件,并且将这次删除放入暂存区
1 git rm [file1] [file2] ...
停止追踪指定文件,但该文件会保留在工作区
改名文件,并且将这个改名放入暂存区
1 git mv [file-original] [file-renamed]
四、代码提交 提交暂存区到仓库区
提交暂存区的指定文件到仓库区
1 git commit [file1] [file2] ... -m [message]
提交工作区自上次commit之后的变化,直接到仓库区
提交时显示所有diff信息
使用一次新的commit,替代上一次提交
如果代码没有任何新变化,则用来改写上一次commit的提交信息
1 git commit --amend -m [message]
重做上一次commit,并包括指定文件的新变化
1 git commit --amend [file1] [file2] ...
五、分支 列出所有本地分支
列出所有远程分支
列出所有本地分支和远程分支
新建一个分支,但依然停留在当前分支
1 git branch [branch-name]
新建一个分支,并切换到该分支
1 git checkout -b [branch]
新建一个分支,指向指定commit
1 git branch [branch] [commit]
新建一个分支,与指定的远程分支建立追踪关系
1 git branch --track [branch] [remote-branch]
切换到指定分支,并更新工作区
1 git checkout [branch-name]
切换到上一个分支
建立追踪关系,在现有分支与指定的远程分支之间
1 git branch --set-upstream [branch] [remote-branch]
合并指定分支到当前分支
选择一个commit,合并进当前分支
1 git cherry-pick [commit]
删除分支
1 git branch -d [branch-name]
删除远程分支
1 2 3 git push origin --delete [branch-name] git branch -dr [remote/branch]
六、标签 列出所有tag
新建一个tag在当前commit
新建一个tag在指定commit
删除本地tag
删除远程tag
1 git push origin :refs/tags/[tagName]
查看tag信息
提交指定tag
提交所有tag
1 git push [remote] --tags
新建一个分支,指向某个tag
1 git checkout -b [branch] [tag]
七、查看信息 显示有变更的文件
显示当前分支的版本历史
显示commit历史,以及每次commit发生变更的文件
搜索提交历史,根据关键词
显示某个commit之后的所有变动,每个commit占据一行
1 git log [tag] HEAD --pretty=format:%s
显示某个commit之后的所有变动,其”提交说明”必须符合搜索条件
1 git log [tag] HEAD --grep feature
显示某个文件的版本历史,包括文件改名
1 2 3 git log --follow [file] git whatchanged [file]
显示指定文件相关的每一次diff
显示过去5次提交
1 git log -5 --pretty --oneline
显示所有提交过的用户,按提交次数排序
显示指定文件是什么人在什么时间修改过
显示暂存区和工作区的差异
显示暂存区和上一个commit的差异
1 git diff --cached [file]
显示工作区与当前分支最新commit之间的差异
显示两次提交之间的差异
1 git diff [first-branch]...[second-branch]
显示今天你写了多少行代码
1 git diff --shortstat "@{0 day ago}"
显示某次提交的元数据和内容变化
显示某次提交发生变化的文件
1 git show --name-only [commit]
显示某次提交时,某个文件的内容
1 git show [commit]:[filename]
显示当前分支的最近几次提交
八、远程同步 下载远程仓库的所有变动
显示所有远程仓库
显示某个远程仓库的信息
1 git remote show [remote]
增加一个新的远程仓库,并命名
1 git remote add [shortname] [url]
取回远程仓库的变化,并与本地分支合并
1 git pull [remote] [branch]
上传本地指定分支到远程仓库
1 git push [remote] [branch]
强行推送当前分支到远程仓库,即使有冲突
1 git push [remote] --force
推送所有分支到远程仓库
九、撤销 恢复暂存区的指定文件到工作区
恢复某个commit的指定文件到暂存区和工作区
1 git checkout [commit] [file]
恢复暂存区的所有文件到工作区
重置暂存区的指定文件,与上一次commit保持一致,但工作区不变
重置暂存区与工作区,与上一次commit保持一致
重置当前分支的指针为指定commit,同时重置暂存区,但工作区不变
重置当前分支的HEAD为指定commit,同时重置暂存区和工作区,与指定commit一致
1 git reset --hard [commit]
重置当前HEAD为指定commit,但保持暂存区和工作区不变
1 git reset --keep [commit]
新建一个commit,用来撤销指定commit
后者的所有变化都将被前者抵消,并且应用到当前分支
暂时将未提交的变化移除,稍后再移入
1 2 3 git stash git stash pop
十、其他 生成一个可供发布的压缩包
4、Git 使用规范流程 团队开发中,遵循一个合理、清晰的Git使用流程,是非常重要的。
否则,每个人都提交一堆杂乱无章的commit,项目很快就会变得难以协调和维护。
下面是ThoughtBot 的Git使用规范流程。我从中学到了很多,推荐你也这样使用Git。
第一步:新建分支
首先,每次开发新功能,都应该新建一个单独的分支(这方面可以参考《Git分支管理策略》 )。
获取主干最新代码
1 2 3 git checkout master git pull
新建一个开发分支myfeature
1 git checkout -b myfeature
第二步:提交分支commit
分支修改后,就可以提交commit了。
1 2 3 4 5 git add --all git status git commit --verbose
git add 命令的all参数,表示保存所有变化(包括新建、修改和删除)。从Git 2.0开始,all是 git add 的默认参数,所以也可以用 git add . 代替。
git status 命令,用来查看发生变动的文件。
git commit 命令的verbose参数,会列出 diff 的结果。
第三步:撰写提交信息
提交commit时,必须给出完整扼要的提交信息,下面是一个范本。
1 2 3 4 5 6 7 Present-tense summary under 50 characters * More information about commit (under 72 characters). * More information about commit (under 72 characters). http://project.management-system.com/ticket/123
第一行是不超过50个字的提要,然后空一行,罗列出改动原因、主要变动、以及需要注意的问题。最后,提供对应的网址(比如Bug ticket)。
第四步:与主干同步
分支的开发过程中,要经常与主干保持同步。
1 2 3 git fetch origin git rebase origin/master
第五步:合并commit
分支开发完成后,很可能有一堆commit,但是合并到主干的时候,往往希望只有一个(或最多两三个)commit,这样不仅清晰,也容易管理。
那么,怎样才能将多个commit合并呢?这就要用到 git rebase 命令。
1 git rebase -i origin/master
git rebase命令的i参数表示互动(interactive),这时git会打开一个互动界面,进行下一步操作。
下面采用Tute Costa 的例子,来解释怎么合并commit。
1 2 3 4 5 6 7 8 9 10 11 12 13 14 15 16 17 18 19 20 21 22 23 24 25 26 27 28 29 30 31 32 33 34 35 36 37 38 39 40 41 42 43 pick 07c5abd Introduce OpenPGP and teach basic usage pick de9b1eb Fix PostChecker::Post#urls pick 3e7ee36 Hey kids, stop all the highlighting pick fa20af3 git interactive rebase, squash, amend Rebase 8db7e8b..fa20af3 onto 8db7e8b \# Commands: p, pick = use commit r, reword = use commit, but edit the commit message e, edit = use commit, but stop for amending s, squash = use commit, but meld into previous commit f, fixup = like "squash", but discard this commit's log message x, exec = run command (the rest of the line) using shell \# These lines can be re-ordered; they are executed from top to bottom. \# If you remove a line here THAT COMMIT WILL BE LOST. \# However, if you remove everything, the rebase will be aborted. \# Note that empty commits are commented out
上面的互动界面,先列出当前分支最新的4个commit(越下面越新)。每个commit前面有一个操作命令,默认是pick,表示该行commit被选中,要进行rebase操作。
4个commit的下面是一大堆注释,列出可以使用的命令。
pick:正常选中
reword:选中,并且修改提交信息;
edit:选中,rebase时会暂停,允许你修改这个commit(参考这里 )
squash:选中,会将当前commit与上一个commit合并
fixup:与squash相同,但不会保存当前commit的提交信息
exec:执行其他shell命令
上面这6个命令当中,squash和fixup可以用来合并commit。先把需要合并的commit前面的动词,改成squash(或者s)。
pick 07c5abd Introduce OpenPGP and teach basic usage
s de9b1eb Fix PostChecker::Post#urls
s 3e7ee36 Hey kids, stop all the highlighting
pick fa20af3 git interactive rebase, squash, amend
这样一改,执行后,当前分支只会剩下两个commit。第二行和第三行的commit,都会合并到第一行的commit。提交信息会同时包含,这三个commit的提交信息。
1 2 3 4 5 6 7 8 9 10 11 12 13 14 15 16 17 18 19 20 21 22 23 24 25 26 27 28 29 This is a combination of 3 commits. The first commit's message is: Introduce OpenPGP and teach basic usage This is the 2nd commit message: Fix PostChecker::Post#urls This is the 3rd commit message: Hey kids, stop all the highlighting 如果将第三行的squash命令改成fixup命令。 pick 07c5abd Introduce OpenPGP and teach basic usage s de9b1eb Fix PostChecker::Post#urls f 3e7ee36 Hey kids, stop all the highlighting pick fa20af3 git interactive rebase, squash, amend
运行结果相同,还是会生成两个commit,第二行和第三行的commit,都合并到第一行的commit。但是,新的提交信息里面,第三行commit的提交信息,会被注释掉。
1 2 3 4 5 6 7 8 9 10 11 12 13 14 15 16 17 This is a combination of 3 commits. The first commit's message is: Introduce OpenPGP and teach basic usage This is the 2nd commit message: Fix PostChecker::Post#urls This is the 3rd commit message: Hey kids, stop all the highlighting
Pony Foo 提出另外一种合并commit的简便方法,就是先撤销过去5个commit,然后再建一个新的。
1 2 3 4 5 6 7 8 9 10 11 12 13 14 15 git reset HEAD~5 git add . git commit -am "Here's the bug fix that closes #28" git push --force squash和fixup命令,还可以当作命令行参数使用,自动合并commit。 git commit --fixup git rebase -i --autosquash
这个用法请参考这篇文章 ,这里就不解释了。
第六步:推送到远程仓库 合并commit后,就可以推送当前分支到远程仓库了。
1 git push --force origin myfeature
git push命令要加上force参数,因为rebase以后,分支历史改变了,跟远程分支不一定兼容,有可能要强行推送(参见这里 )。
第七步:发出Pull Request 提交到远程仓库以后,就可以发出 Pull Request 到master分支,然后请求别人进行代码review,确认可以合并到master。
5、Git远程操作详解 Git 是目前最流行的版本管理系统 ,学会Git几乎成了开发者的必备技能。
Git有很多优势,其中之一就是远程操作非常简便。本文详细介绍5个Git命令,它们的概念和用法,理解了这些内容,你就会完全掌握Git远程操作。
git clone
git remote
git fetch
git pull
git push
本文针对初级用户,从最简单的讲起,但是需要读者对Git的基本用法有所了解。同时,本文覆盖了上面5个命令的几乎所有的常用用法,所以对于熟练用户也有参考价值。
一、git clone 远程操作的第一步,通常是从远程主机克隆一个版本库,这时就要用到git clone命令。
比如,克隆jQuery的版本库。
1 git clone https://github.com/jquery/jquery.git
该命令会在本地主机生成一个目录,与远程主机的版本库同名。如果要指定不同的目录名,可以将目录名作为git clone命令的第二个参数。
1 git clone <版本库的网址><本地目录名>
git clone支持多种协议,除了HTTP(s)以外,还支持SSH、Git、本地文件协议等,下面是一些例子。
1 2 3 4 5 6 7 8 9 10 11 12 13 git clone http[s]://example.com/path/to/repo.git/ git clone ssh://example.com/path/to/repo.git/ git clone git://example.com/path/to/repo.git/ git clone /opt/git/project.git git clone file:///opt/git/project.git git clone ftp[s]://example.com/path/to/repo.git/ git clone rsync://example.com/path/to/repo.git/
SSH协议还有另一种写法。
1 git clone [user@]example.com:path/to/repo.git/
通常来说,Git协议下载速度最快,SSH协议用于需要用户认证的场合。各种协议优劣的详细讨论请参考官方文档 。
二、git remote 为了便于管理,Git要求每个远程主机都必须指定一个主机名。git remote命令就用于管理主机名。
不带选项的时候,git remote命令列出所有远程主机。
使用-v选项,可以参看远程主机的网址。
1 2 3 4 5 git remote -v origin [git@github](mailto:git@github).com:jquery/jquery.git (fetch) origin [git@github](mailto:git@github).com:jquery/jquery.git (push)
上面命令表示,当前只有一台远程主机,叫做origin,以及它的网址。
克隆版本库的时候,所使用的远程主机自动被Git命名为origin。如果想用其他的主机名,需要用git clone命令的-o选项指定。
1 2 3 4 5 git clone -o jQuery https://github.com/jquery/jquery.git git remote jQuery
上面命令表示,克隆的时候,指定远程主机叫做jQuery。
1 2 3 4 5 6 7 8 9 10 11 12 13 14 15 16 git remote show命令加上主机名,可以查看该主机的详细信息。 git remote show <主机名> git remote add命令用于添加远程主机。 git remote add <主机名><网址> git remote rm命令用于删除远程主机。 git remote rm <主机名> git remote rename命令用于远程主机的改名。 git remote rename <原主机名><新主机名>
三、git fetch 一旦远程主机的版本库有了更新(Git术语叫做commit),需要将这些更新取回本地,这时就要用到git fetch命令。
上面命令将某个远程主机的更新,全部取回本地。
git fetch命令通常用来查看其他人的进程,因为它取回的代码对你本地的开发代码没有影响。
默认情况下,git fetch取回所有分支(branch)的更新。如果只想取回特定分支的更新,可以指定分支名。
比如,取回origin主机的master分支。
所取回的更新,在本地主机上要用”远程主机名/分支名”的形式读取。比如origin主机的master,就要用origin/master读取。
git branch命令的-r选项,可以用来查看远程分支,-a选项查看所有分支。
1 2 3 4 5 6 7 8 9 10 git branch -r origin/master git branch -a *master remotes/origin/master
上面命令表示,本地主机的当前分支是master,远程分支是origin/master。
取回远程主机的更新以后,可以在它的基础上,使用git checkout命令创建一个新的分支。
1 git checkout -b newBrach origin/master
上面命令表示,在origin/master的基础上,创建一个新分支。
此外,也可以使用git merge命令或者git rebase命令,在本地分支上合并远程分支。
或者
1 git rebase origin/master
上面命令表示在当前分支上,合并origin/master。
四、git pull git pull命令的作用是,取回远程主机某个分支的更新,再与本地的指定分支合并。它的完整格式稍稍有点复杂。
1 git pull <远程主机名><远程分支名>:<本地分支名>
比如,取回origin主机的next分支,与本地的master分支合并,需要写成下面这样。
1 git pull origin next:master
如果远程分支是与当前分支合并,则冒号后面的部分可以省略。
上面命令表示,取回origin/next分支,再与当前分支合并。实质上,这等同于先做git fetch,再做git merge。
1
2
3
git fetch origin git merge origin/next
在某些场合,Git会自动在本地分支与远程分支之间,建立一种追踪关系(tracking)。比如,在git clone的时候,所有本地分支默认与远程主机的同名分支,建立追踪关系,也就是说,本地的master分支自动”追踪”origin/master分支。
Git也允许手动建立追踪关系。
1 git branch --set-upstream master origin/next
上面命令指定master分支追踪origin/next分支。
如果当前分支与远程分支存在追踪关系,git pull就可以省略远程分支名。
上面命令表示,本地的当前分支自动与对应的origin主机”追踪分支”(remote-tracking branch)进行合并。
如果当前分支只有一个追踪分支,连远程主机名都可以省略。
上面命令表示,当前分支自动与唯一一个追踪分支进行合并。
如果合并需要采用rebase模式,可以使用–rebase选项。
1 git pull --rebase <远程主机名><远程分支名>:<本地分支名>
如果远程主机删除了某个分支,默认情况下,git pull 不会在拉取远程分支的时候,删除对应的本地分支。这是为了防止,由于其他人操作了远程主机,导致git pull不知不觉删除了本地分支。
但是,你可以改变这个行为,加上参数 -p 就会在本地删除远程已经删除的分支。
等同于下面的命令
1
2
3
git fetch --prune origin git fetch -p
五、git push git push命令用于将本地分支的更新,推送到远程主机。它的格式与git pull命令相仿。
1 git push <远程主机名><本地分支名>:<远程分支名>
注意,分支推送顺序的写法是<来源地>:<目的地>,所以git pull是<远程分支>:<本地分支>,而git push是<本地分支>:<远程分支>。
如果省略远程分支名,则表示将本地分支推送与之存在”追踪关系”的远程分支(通常两者同名),如果该远程分支不存在,则会被新建。
上面命令表示,将本地的master分支推送到origin主机的master分支。如果后者不存在,则会被新建。
如果省略本地分支名,则表示删除指定的远程分支,因为这等同于推送一个空的本地分支到远程分支。
等同于
1 git push origin --delete master
上面命令表示删除origin主机的master分支。
如果当前分支与远程分支之间存在追踪关系,则本地分支和远程分支都可以省略。
上面命令表示,将当前分支推送到origin主机的对应分支。
如果当前分支只有一个追踪分支,那么主机名都可以省略。
如果当前分支与多个主机存在追踪关系,则可以使用-u选项指定一个默认主机,这样后面就可以不加任何参数使用git push。
1 git push -u origin master
上面命令将本地的master分支推送到origin主机,同时指定origin为默认主机,后面就可以不加任何参数使用git push了。
不带任何参数的git push,默认只推送当前分支,这叫做simple方式。此外,还有一种matching方式,会推送所有有对应的远程分支的本地分支。Git 2.0版本之前,默认采用matching方法,现在改为默认采用simple方式。如果要修改这个设置,可以采用git config命令。
1 git config --global push.default matching
或者
1 git config --global push.default simple
还有一种情况,就是不管是否存在对应的远程分支,将本地的所有分支都推送到远程主机,这时需要使用–all选项。
上面命令表示,将所有本地分支都推送到origin主机。
如果远程主机的版本比本地版本更新,推送时Git会报错,要求先在本地做git pull合并差异,然后再推送到远程主机。这时,如果你一定要推送,可以使用–force选项。
上面命令使用–force选项,结果导致远程主机上更新的版本被覆盖。除非你很确定要这样做,否则应该尽量避免使用–force选项。
最后,git push不会推送标签(tag),除非使用–tags选项。


