
1、下载NexT主题,下载解压后,将该文件夹命名为next,把这个文件夹放置到博客目录的themes 文件夹下,如图所示: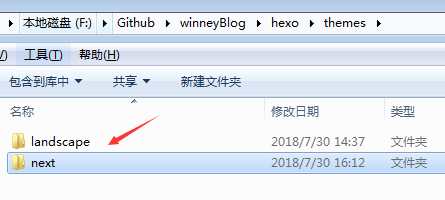
想了解更多,可以查看NexT 主题使用文档: 官方使用文档
2、修改主配置文件_config.yml(hexo目录下的_config.yml文件),将theme属性修改为next,如下所示:
1 | # Extensions 扩展 |
3、在博客目录,右键点击Git Bash,进入命令窗口,输入下面的命令,本地预览博客,如果发现Hexo博客的主题已经变成了NexT主题,说明你已经成功更换主题了
1 | hexo server |
4、打开主题配置文件 _config.yml
如图所示:
5、在主题配置文件 _config.yml中将scheme设置为 Pisces(Hexo默认样式是Muse,根据你自己的喜好选择你想要设置的样式,这里以Pisces为例)
1 | # --------------------------------------------------------------- |
6、在主题配置文件 _config.yml中配置博客网站底部的基本信息:
1 | footer: |
7、在主题配置文件 _config.yml中配置菜单按钮,找到menu属性,做以下配置:
1
2
3
4
5
6
7
8
9menu:
home: / || home #首页,后面的表示图标
categories: /categories/ || th #分类
tags: /tags/ || tags #标签
archives: /archives/ || archive #归档
about: /about/ || user #关于
#schedule: /schedule/ || calendar
#sitemap: /sitemap.xml || sitemap
#commonweal: /404/ || heartbeat
8、创建相应的页面
(1)执行命令hexo s,本地预览我们的博客页面,会发现,点击分类、标签、关于这几个页面的时候,会显示404。
(2)在Git Bash命令窗口,输入以下命令来创建相应页面:
1 | hexo new page 'categories' |
(3)可以在hexo/source目录下看到创建的3个文件夹
如图所示: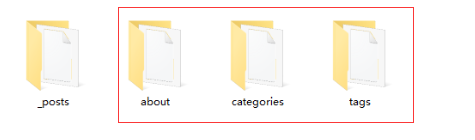
9、每一个分类菜单都生成了一个 index.md 初始文件(在刚创建的文件夹目录下),默认包含了 title 和 date 字段,我们需要给每一 index.md 文件添加上 type 字段
如下所示:
1 | --- |
1 | --- |
1 | --- |
10、配置搜索菜单:
(1)安装 hexo-generator-searchdb ,在 Git Bash 命令窗口,输入以下命令:
1 | npm install hexo-generator-searchdb --save |
(2)打开全局配置文件(hexo/_config.yml),新增以下代码:
1 | search: |
(3)打开主题配置文件(hexo/themes/next/_config.yml),找到 local_search 属性,开启本地搜索功能:
1 | local_search: |
11、执行命令hexo s,本地预览我们的博客页面,发现刚才的配置已经完成
如图所示:
12、在命令窗口,输入以下命令,将修改后的本地hexo项目托管到GitHub上
1 | hexo clean && hexo g && hexo d |
13、上传成功后,可以通过自己的博客域名访问修改主题和修改相关配置后的博客页面